
 Every aspect of your home is essential, but the roof is its real asset. Without a roof, your house can’t provide real shelter. For this reason, you need always to give serious attention to your home. So, in this article, you will learn how to shingle a shed roof. But before we discuss shingling a shed roof, let’s quickly look at the meaning of Shed Roof. A shed roof is like a flat roof at a steeper slope. Alternatively, you can think of it as one half of a traditional gable roof. However, every shed roof has one thing in common – a single slope that varies in steepness depending on the design. In the past, shed roof style was mainly used on sheds. But things are changing, and shed roofs are more prevalent in residential homes. The advantage of shed roofs is that they don’t give room for corners and low points on the walls; this helps to create enough usable space inside. Over time, sheds have become important storage areas that should protect your possessions from weather elements. But you can’t achieve this without a well-shingled roof. When a shed isn’t shingled, water will drip through it and possibly damage everything you stored in there.
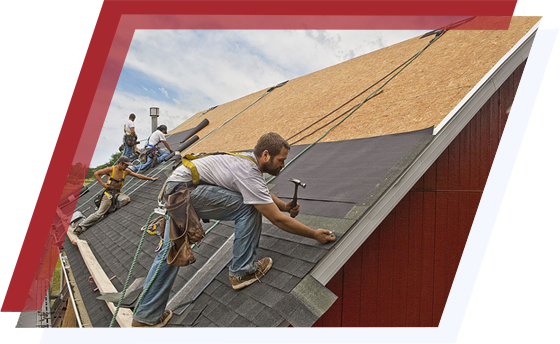
The good news is, it’s relatively simple to shingle a shed roof. And if you do it correctly, you may not replace it for a long time. So, keep reading and learn the step by step guide on how to shingle a shed roof. Functions of Roof Shingles Shingles are the easiest way to waterproof your roof. They create a barrier that protects your roof, its structure, and contents from weather elements. Ordinarily, if moisture gets under shingles, it causes rots, leaks, and mold. And it continues overtime without proffering solution to it; your roof integrity will be compromised. And it could make your roof collapse. Furthermore, the better the shingle, the longer and well protected your roof will become. Again, your shingles will go a long way to determine your energy efficiency. Shingles’color and composition affect the transfer of heat, which directly affects your home’s energy efficiency. Outside the protection against weather elements, shingles also improve the aesthetic of your shed. Correctly layered shingles are a beautiful crown on any home. Installing shingles is a bit technical, but this our guide on how to shingle a shed roof will make the whole process easy for you. You don’t need to be a professional roofer before you can shingle a roof. All you have to do is to follow our guide. The materials you need to shingle a shed roof are; 15 pound roofing felt, drip edge, staples, 2d (1 inch) Galvanized Roofing Nails, Shingles, Safety Glasses, Hammer, Staple gun, chalk line, and work gloves. Safety Measures When Shingling a Shed Roof Whenever you are carrying out any DIY project, never neglect safety. A little negligence of safety when shingling a shed roof could be dangerous. So, ensure you are always wearing goggles and work with your gloves on at all times. Again, while on the roof, focus on the task and don’t allow anything to distract you. Any distraction may lead to a severe accident. It’s advisable always to wear the appropriate shoe to keep you steady while on the roof. About 82% of roof accidents are usually due to negligence. So, pay attention to where you step and keep your balance at all times. Also, it’s preferable always to use fall protection, body harness, tying off securely whenever you are working on a roof higher than 6 feet above the ground. Trust me, most falls from 20 feet above the ground or higher are always fatal. Step by Step Guide On How To Shingle A Shed Roof Step 1 – Remove Old Roofing Materials If you are shingling an old shed, it’s advisable to remove the existing shingles before you lay a new one. To remove these old roofing materials, use a fork to work the edges lose and start stripping them with a shovel. After removing these old materials from the shed, ensure you discard them properly. I’m sure you won’t want to litter your environment with damaged roofing materials. Step 2 – Apply Roofing Paper Just as plastering a wall provides an appropriate base before painting, roofing paper acts as the base of a roof before you install shingles. If you are shingling the shed for the first time, there will be no need to remove any old material. All you need to do is to apply the roofing paper directly. It may interest you to know that applying roofing paper before installing a shingle makes your shed roof more durable. Step 3 – Layer the Shingles This step is a comprehensive process, and you need to give it serious attention. Most times, your roof’s strength and absorbing capacity is a function of the layering process. In other words, how you lay, the shingle will go a long way to affect the roof. Shingles' layering process has different phases, and you need to take every aspect seriously. So, here’s a step by step process to layer your shingles. Properly Size the Shingles The first principle for layering shingles is to size them correctly. And most times, the roof’s shape determines your shingles’ size. So, measure the roof and size the shingles accordingly. Start With the Bottom of the Roof Ordinarily, it’s better to start layering shingles from the bottom of the roof. This is because you need to place nails properly at the narrow bottom row so that the next row can hold the lower row’s top edge and provide shape for the roof. Furthermore, mark the cutouts at a point where the tab meets the upper part of the shingles and place the nails above the cutouts. Try to set the air compressor to ensure that nails do not smash through the shingles. The First Row after Starter Narrow Row Once you are through with lying shingles on the narrow bottom row and nails placement, use chalk to mark a line over the starting row, this will help you put up the first row. There are instances when manufacturers supply the first row separately because of their sizes. They are usually less than the standard size for sheds. Once you sort out the first row shingles, use nails to place it on the roof. Lay the Second Row and Every Other One When layering shingles, the first row, and the narrow starter rows are always a bit technical. But when you get them right, the process will be easier. But people who don’t know how to shingle a shed roof find this stage very complicating. All you need to do is to chalk out lines to lay the shingles horizontally. In doing this, ensure that the bottom of the subsequent tabs touches the top of the shingles lying below. The essence of this is to leave no space between shingles and give your roof adequate protection against weather elements. So, this is how you shingle a shed roof one after the other till it reaches the peak. Covering Chimneys and Vents The last part of shingles layering is covering chimneys and vents. They usually face the sky and come in different shapes. However, it’s advisable to protect your chimneys and vents with extra layers before covering them with shingles. This is to ensure that the heat from the chimney and vents don’t run down your shingles. So, it’s advisable to get a non-corroding metal base flashing using aluminum sheets or cemented layers of flashing. Step 4 – Cap the Top Ensure that you use adhesive on the last row of tiles to get a secure hold. To do this, you can either buy a ridge cap shingles or shape regular shingles to fit over the area. Furthermore, try to lay them starting from one end and moving to the other. Always overlap as you go. If you can use this approach, you will get a durable waterproof shed roof. The roof could last up to 30 years, depending on your shingles’ thickness. And if you live in high winds area, thicker shingles will be a great idea because they can withstand weather elements and last longer. I forget to mention something; thicker shingles are also more expensive. But whichever way you choose to go, you will always have protected storage space. You see, it’s easy to shingle a shed roof. But ensure you take precautions throughout the process. Ensure you are wearing non-slippery footwear and adhere to other safety guidelines. |
Archives
February 2020
Categories
All
|

|
|
 RSS Feed